AN ITALIAN ADVENTURE
Intention & Professional application
For this module I intend to produce at least 10 architectural images, using material collected on my recent visit to Naples and the surrounding area.
These will form a portfolio of images which can be used in a professional application, for example to illustrate guide and travel journals, as art work for books, magazines or calenders, in photojournalism or as illustrations in architectural magazines.
Stimulus & Influences
My stimulus for this has been my recent visit to Italy and the desire to capture a photographic record of the amazing buildings I have seen there, with all the influences that have come from the peoples of ancient and modern civilisations, who have made a home in this part of the world.
I have been influenced by historians and archaeologists past and present, fist during my school years when ancient history was part of the curriculum and latterly by some of the excellent history programmes shown on television.
Equipment & Media
Since this trip to Italy is primarily a touring holiday, I have only been able to take one camera due to luggage weight restrictions. I will therefore be using my Canon EOS 5D MK11 with 24 - 70mm lens and polarising filter where necessary. I do not have a tilt and shift lens available and feel that this will not be needed since it is an artistic impression I want to achieve. It would be nice to have a tripod available to enable me to take some shots in low light or at night, but unfortunately this is not possible.
I will publish the finished photographs in a portfolio available via the internet, either on a dedicated photosharing website or on blogger. I feel this is more convenient since I will not have to carry around a bulky portfolio of printed photographs and can reach a larger audience without having to be physically present myself.
Techniques
Since my portfolio is not intended for illustration of technical journals, I would like to capture an artistic impression of architecture, rather than a technically correct photograph, showing no perspective for example. On the contrary I prefer the exagerated, elongated look that is achieved by standing close to a structure and shooting upwards.
As well as photographing buildings as a whole, I want to show detail in the architecture by taking close-up shots of interesting decoration and fittings, internally as well as externally. In order to isolate detail, I want to use, where possible due to lighting conditions, a wide aperture in order to throw surroundings distractions, out of focus.
Lighting
I do not have any flash equipment available and could not carry it with me due to the nature of the trip, so I will be relying on ambient light. This may be problematical since many churches and museums have small windows which let in only a limited amount of light. However, this can provide some dramatic shafts of light which will give exciting results.
If light levels are low I will have to increase ISO, I have up to a reading of 6400, which can be expanded to 12800 and 25600 in very extreme cases. I anticipate keeping the iso to 2500 and lower where possible, since at higher readings picture quality deteriorates.
Health & Safety
Since I am taking photographs as a tourist on holiday and in public places, I should not need any special permissions. The general public and authorities seem to be well used to tourists snapping away and I have never been challenged as to what I am doing. However, I would not try to take pictures in a sensitive location, such as a police station or army barracks for example, unless I was commissioned to do so. I would then have to obtain the necessary permissions from any authorities involved.
I am always sensitive as to the reactions of other people whom I may capture in my photographs, if anyone objected I would discontinue and would not try to photograph children unless given permission by their parent or responsible adult.
The other considerations relate to personal safety, trips or falls, traffic and obstructions, climbing or making myself a hazard by obstructing others, or personal safety as in being attacked if out alone or threatened in a robbery.
Tuesday, 23 November 2010
Monday, 22 November 2010
Street & Architectural Photography
This is an interesting short video combining architectural and street photography, it also encompasses graffiti and street art, illustrating how the divisions between these genres can be blurred.
Architectural shots can often be enhanced, adding scale by including people, trees, cars, showing how these buildings and spaces are used.
Sunday, 21 November 2010
Low light photography tips
Low light photography tips
Posted: 17 Nov 2010
Low light photography - Robin Whalley's low light photography advice.
Words and images by Robin Whalley.
Gear:
Shutter speeds
Low light means slow shutter speeds and you need to know how you will deal with this. If your shutter speed is too slow to hand hold you will end up taking blurred images (not always a bad thing). Ask yourself, do you want a blurred image or a sharp image? If you want a sharp image you need to find a way to support the camera so you can manage the slow shutter speed, or find a way to increase the shutter speed. We will look at some of the techniques you can use to achieve sharp images in low light shortly.
If however you want a blurred image then you may need to slow down the shutter speed even further so you can ensure the image is blurred and isn’t just camera shake. Remember camera shake is poor technique and obvious. Deliberately blurring an image for creative effect requires good technique in order to appear attractive. If you want to experiment with creative blur in low light situations you should try to create shutter speeds of at least a second or more and experiment with different camera movements. Consider also experimenting with a shallow depth of field and defocusing the subject whilst moving the camera.
Movement
Low light conditions also provide opportunities for you to accentuate movement in your images, for example people moving around a train station or in a night club. It’s often the contrast between sharp stationary objects and blurred moving objects that give such images appeal. Consider how you could use low light levels to create this contrasting effect. In some locations, the light levels might be too high for this, even when you reduce the aperture to its minimum. You can artificially limit light reaching your sensor to achieve longer shutter speeds with 8 and 10 stop filters, but don’t forget you can also use a polarizing filter which will typically remove 3 stops of light.
Panning is another creative technique that can be used in low light conditions. Simply mount your camera on a tripod and pan the camera as you release the shutter. For the best results ensure you have the tripod level so that the horizon is level throughout the panning. I find longer lenses tend to give better results than wide angle. It’s helpful to use a cable or remote release so that you don’t need to press the shutter button as you pan.
Sharp image
If you want to create a sharp image in low light conditions, conventional wisdom says you should try for a shutter speed at least as fast as the focal length of your lens. For example, if you are using a 200mm lens then your shutter speed should be at least 1/200” or preferably faster. If your sensor is a cropped frame sensor and has a magnification factor then this will require an even faster shutter speed e.g. a 200mm lens on a 1.5x crop sensor effectively becomes a 300mm lens so needs a shutter speed of at least 1/300”. There are however lots of ways to improve this to allow shooting at much slower shutter speeds.
The best and most obvious option is to mount the camera on a support such as tripod but this isn’t always possible. In such circumstances consider using other support such as a monopod, clamp or beanbag. The innovative gorillapod is very flexible and can be wrapped around railings and posts to provide a good support. The “reverse monopod” is also worth considering and you can make your own easily from a length of string. Attach a piece of string to the bottom of your camera (I tie it to a tripod quick release plate screwed to my camera) and tie a loop in the other end. Put your foot through the loop and bring the camera up to your eye so that the string pulls tight. You will need to experiment a little to get the length correct but once made it can easily fit in your pocket. This is an ideal accessory for inside churches and houses where tripods and monopods might be prohibited.
Handhold shots
If you need to handhold your shots, good technique is vitally important. Where possible, try to find a position where you can brace yourself against something solid in order to reduce shake. Hold the camera too tight or away from you and you will introduce shake. I have a little Sony with an articulated screen which comes in useful for shooting at waist height. I find I can adopt a position with this camera at waist height that allows me to shoot as slow as ¼” and still achieve sharp images. Brace the camera against something solid and you can achieve even slower shutter speeds. In this shot of the spiral stairs inside the London Monument the shutter speed was in excess of half a second and was achieved by holding the lens against the handrail.
When you come to take the picture be sure also not to snatch the shot but to carefully squeeze the shutter release. I would also suggest with slower shutter speeds to switch your camera onto continuous shooting rather than single shot (if your camera supports this). This allows you to keep the shutter button pressed and take perhaps 3-6 images in quick succession. I have found when I do this that usually at least one of the images comes out pin sharp despite the shutter speed being very slow.
ISO
Increasing the ISO is another obvious ways to achieve a faster shutter speed, the downside being increased noise levels. In recent years camera manufacturers such as Nikon have made great advances in high ISO quality and you can certainly achieve usable shots at ISO 800 or 1600. It’s also worth considering the use you will put the image to and the resolution of your camera. If you have a 14Mpixel camera and you are shooting images for display on the web at 800-1200 pixels then you can get away with higher ISO than if you wanted to produce a large A3+ fine art print.
RAW or JPEG?
Do you shoot in RAW or JPEG? When shooting in JPEG your camera probably gives you little or no control over how noise is removed and you may find detail in your image becomes “mushy”. Shooting in RAW will give you much more post production control over noise removal and allow you to fine tune this to your image, retaining far more detail.
Image stabilisation
Finally, if you have image stabilisation in your camera or lenses make use of it.
Low light situations can offer some of the most beautiful and creative light but you need to have good technique to be ready to take advantage when the opportunities present themselves.
Words and images by Robin Whalley.
Gear:
- A Camera such as the Nikon D7000 which offers control over the ISO, Aperture and/or Shutter speed.
- For stability - Tripod, Monopod, Gorillapod, Clamp, Beanbag or SteadePod.
- Cable or remote release
- 8 or 10 stop Neutral Density filter, Regular Neutral Density filters and a Polarizing filter.
- Shutter speeds
- Adding movement to your shots
- Create a sharp image
- Working without a tripod
- ISO choices
- Shoot RAW or JPEG?
- Image stabilisation
Shutter speeds
Low light means slow shutter speeds and you need to know how you will deal with this. If your shutter speed is too slow to hand hold you will end up taking blurred images (not always a bad thing). Ask yourself, do you want a blurred image or a sharp image? If you want a sharp image you need to find a way to support the camera so you can manage the slow shutter speed, or find a way to increase the shutter speed. We will look at some of the techniques you can use to achieve sharp images in low light shortly.
If however you want a blurred image then you may need to slow down the shutter speed even further so you can ensure the image is blurred and isn’t just camera shake. Remember camera shake is poor technique and obvious. Deliberately blurring an image for creative effect requires good technique in order to appear attractive. If you want to experiment with creative blur in low light situations you should try to create shutter speeds of at least a second or more and experiment with different camera movements. Consider also experimenting with a shallow depth of field and defocusing the subject whilst moving the camera.
Movement
Low light conditions also provide opportunities for you to accentuate movement in your images, for example people moving around a train station or in a night club. It’s often the contrast between sharp stationary objects and blurred moving objects that give such images appeal. Consider how you could use low light levels to create this contrasting effect. In some locations, the light levels might be too high for this, even when you reduce the aperture to its minimum. You can artificially limit light reaching your sensor to achieve longer shutter speeds with 8 and 10 stop filters, but don’t forget you can also use a polarizing filter which will typically remove 3 stops of light.
Panning is another creative technique that can be used in low light conditions. Simply mount your camera on a tripod and pan the camera as you release the shutter. For the best results ensure you have the tripod level so that the horizon is level throughout the panning. I find longer lenses tend to give better results than wide angle. It’s helpful to use a cable or remote release so that you don’t need to press the shutter button as you pan.
Sharp image
If you want to create a sharp image in low light conditions, conventional wisdom says you should try for a shutter speed at least as fast as the focal length of your lens. For example, if you are using a 200mm lens then your shutter speed should be at least 1/200” or preferably faster. If your sensor is a cropped frame sensor and has a magnification factor then this will require an even faster shutter speed e.g. a 200mm lens on a 1.5x crop sensor effectively becomes a 300mm lens so needs a shutter speed of at least 1/300”. There are however lots of ways to improve this to allow shooting at much slower shutter speeds.
The best and most obvious option is to mount the camera on a support such as tripod but this isn’t always possible. In such circumstances consider using other support such as a monopod, clamp or beanbag. The innovative gorillapod is very flexible and can be wrapped around railings and posts to provide a good support. The “reverse monopod” is also worth considering and you can make your own easily from a length of string. Attach a piece of string to the bottom of your camera (I tie it to a tripod quick release plate screwed to my camera) and tie a loop in the other end. Put your foot through the loop and bring the camera up to your eye so that the string pulls tight. You will need to experiment a little to get the length correct but once made it can easily fit in your pocket. This is an ideal accessory for inside churches and houses where tripods and monopods might be prohibited.
Handhold shots
If you need to handhold your shots, good technique is vitally important. Where possible, try to find a position where you can brace yourself against something solid in order to reduce shake. Hold the camera too tight or away from you and you will introduce shake. I have a little Sony with an articulated screen which comes in useful for shooting at waist height. I find I can adopt a position with this camera at waist height that allows me to shoot as slow as ¼” and still achieve sharp images. Brace the camera against something solid and you can achieve even slower shutter speeds. In this shot of the spiral stairs inside the London Monument the shutter speed was in excess of half a second and was achieved by holding the lens against the handrail.
When you come to take the picture be sure also not to snatch the shot but to carefully squeeze the shutter release. I would also suggest with slower shutter speeds to switch your camera onto continuous shooting rather than single shot (if your camera supports this). This allows you to keep the shutter button pressed and take perhaps 3-6 images in quick succession. I have found when I do this that usually at least one of the images comes out pin sharp despite the shutter speed being very slow.
ISO
Increasing the ISO is another obvious ways to achieve a faster shutter speed, the downside being increased noise levels. In recent years camera manufacturers such as Nikon have made great advances in high ISO quality and you can certainly achieve usable shots at ISO 800 or 1600. It’s also worth considering the use you will put the image to and the resolution of your camera. If you have a 14Mpixel camera and you are shooting images for display on the web at 800-1200 pixels then you can get away with higher ISO than if you wanted to produce a large A3+ fine art print.
RAW or JPEG?
Do you shoot in RAW or JPEG? When shooting in JPEG your camera probably gives you little or no control over how noise is removed and you may find detail in your image becomes “mushy”. Shooting in RAW will give you much more post production control over noise removal and allow you to fine tune this to your image, retaining far more detail.
Image stabilisation
Finally, if you have image stabilisation in your camera or lenses make use of it.
Low light situations can offer some of the most beautiful and creative light but you need to have good technique to be ready to take advantage when the opportunities present themselves.
Words and images by Robin Whalley.
Sunday, 14 November 2010
LENSBABY/EQUIPMENT RESEARCH
Lensbaby make a range of lenses which combine with a bellows or ball and socket mechanism, to allow special effects photogaphy similar to that of a view camera. At 50mm they are a normal focal length lens, in the 35mm format. The front standard can be manipulated to move the area of focus anywhere in the frame, keeping the important part of the subject in focus, whilst blurring the rest of the image, even if it is level with the area of focus.
Aperture is controlled by a series of interchangeable discs, with normal focus of about two feet, closer focus is achieved by pushing the front lens out and infinity by pushing it in towards the base of the lens.

The resulting images have some chromatic and spherical aberration, around the central 'sweet spot' in focus. There is usually also oval bokeh around the focus point, bokeh is used to describe the aesthetic quality of blur in out of focus areas of an image and how the lens shows out of focus points of light.
Bokeh comes from the Japanese word for blur or haze.

An approximation of this effect can be produced by using gaussian blur in editing software, usually used in graphics to soften images and reduce detail or smooth noise referred to as gaussian smoothing.
Some compact and cell-phones also now have 'image destabalisation' where the sensor and lens are both moved to maintain focus on one focal plane whilst blurring nearby ones.

I would like to experiment with this effect in my architectural portfolio, picking out detail and blurring surrounding area. I could achieve this effect to some extent by using a wide aperture, however, this is not possible when picking out detail on a flat wall for example, or using a smaller aperture to pick up detail at a distance.

Silver Drinking Vessel from Pompei
Naples Archaeological Museum
Here I have used a large aperture to pick out detail in the cup, whilst creating a blur to disguise the surrounding cabinet and distractions in the background.

Grape harvest scene on the 'Blue Vase' - Pompei
Naples Archaeological Museum
The same technique has been used here, but I also had four overhead tungsten lights to avoid, unfortunately I was unable to change the white balance on my camera to compensate for their yellow cast, hoping I could deal with this later in photoshop.

Bronze Horse Statue - Pompei
Naples Archaeological Museum
Detail on the main and head of this stature was phenominal and I wanted to focus on this in particular, I think the angle of the shot adds to the feeling of movement in the prancing horse.

Water spouts - Pompei
Naples Archaeological Museum
There was a whole series of these animal heads cast in bronze, I wanted to get a number of them in the shot but to add interest decided to concentrate on one showing the others out of focus.

Runners from the Villa of the Papyri, Pompei
Naples Archaeological Museum
These bronzes are lifesize and were recovered from Pompei during excavations in the 18th century. Found amongst almost 100 other bronzes and sculptures, they were thought to adorn a gymnasium and were cast in the late 4th and early 3rd century BC.
I wanted to get a shot which emphasised movement in these sculptures and capture detail in the faces. It was difficult since there were constantly people moving through and around. With a lensbaby I could have thrown more of the surrounding distractions out of focus, concentrating the viewers eye on the magnificent figures.

Panel from a buriel casket
Naples Archaeological Museum
Here the carving in marble was so detailed I decided to keep as much as possible in focus, it was so beautiful I found it difficult to decide where to focus the lens.
Thursday, 11 November 2010
ARCHITECTURAL PHOTOGRAPHY - EQUIPMENT
When photographing buildings from the ground, it is often impossible to fit an entire building into the frame, without tilting the camera upwards. This results is the top of the structure appearing smaller and vertical lines appearing to converge, this perspective increases in proportion to the angle of view.

Perspective could be eliminated by keeping the camera parallel to the ground, however, this would result in capturing only the bottom part of the building. By keeping the camera parallel and shifting the lens, we could capture an image without perspective distortion.

Perspective Control Lenses allow the photographer to adjust the position of the subject in the image area whilst keeping the camera body parallel, therefore correcting perspective.


A flexible bellows which joins the front and rear standard allows for movement in all directions.
Perspective control in software is now possible as in Photoshop's perspective and distort functions, however, some image resolution may be lost from the most distant parts of the subject.
Personally, unless I was photographing a building for historical record for example, I prefer some perspective, since it adds drama and an artistic element to a picture. It takes the subject out of the mundane and ordinary and adds a different viewpoint.


Perspective could be eliminated by keeping the camera parallel to the ground, however, this would result in capturing only the bottom part of the building. By keeping the camera parallel and shifting the lens, we could capture an image without perspective distortion.

Perspective Control Lenses allow the photographer to adjust the position of the subject in the image area whilst keeping the camera body parallel, therefore correcting perspective.
Keeping the camera level with an ordinary lens, results in capturing the bottom half of the building
Tilting the camera upwards results in vertical perspective
Shifting the lens upwards results in a picture of the entire building
Some lenses provide shift only and are referred to as 'shift lenses', some have tilt and shift and are called, 'tilt-shift' lenses.

Canon TSE 4528 45mm F2.8 Tilt & Shift Lens
View Cameras also offered the same type of flexibility to early photographers and are still used today, but with many refinements. These were developed in the era of the Daguerreotype, the first publicly announced photographic process, named after Louis Daguerre.
A flexible bellows which joins the front and rear standard allows for movement in all directions.
Perspective control in software is now possible as in Photoshop's perspective and distort functions, however, some image resolution may be lost from the most distant parts of the subject.
Personally, unless I was photographing a building for historical record for example, I prefer some perspective, since it adds drama and an artistic element to a picture. It takes the subject out of the mundane and ordinary and adds a different viewpoint.

Amalfi Duomo
Canon EOS 5D MK11 with 24 - 45mm lens

Interior of Naples Archeological Museum
Canon EOS 5D MK11 with 24 - 45mm lens.
Sources - web sites ; photstuff.co.uk
photo.net
wikipedia
Tuesday, 9 November 2010
9 TIPS FOR ARCHITECTURAL PHOTOGRAPHY/RESEARCH

1. Be sensitive to the direction of light, as this can increase contrast, shadows, textures and reflections.
This can be overcome by using exposure compensation, or bracketing, shooting at different exposure levels and then merging the results in Photoshop.
2. Use a wide angle or fish-eye lens to frame the whole building and put it in its environment. If this is not possible, then taking several shots and stitching them together as a panorama, may be an alternative.
3. It isn't always about the exterior, however, remember to compensate for artificial lighting when moving inside. If light levels are low use a tripod with long exposure, or perhaps you could use supplementary lighting such as a diffuse flash. To stop highlights being blown out you could also use an ND graduated filter.
4. You could shoot a structure as a silhouette by positioning the subject between the camera and the sun. Expose for the sky, if the foreground is too light, darken it by using negative exposure compensation. Night shots can be very dramatic, but aim to retain some colour in the sky to add tone to the background and help illuminate detail. A tripod is essential since long exposure will be needed, to keep iso values as low as possible and retain clarity of detail, use as wide an aperture as possible.
5. Exciting architectural images can be taken in all weathers. A storm brewing over a church for example, will add drama and interest to a shot. Try revisiting a subject in different weather conditions to build up a portfolio of images.
6. Use reflections to add an extra dimension to your subject, windows, puddles, sunglasses and wet streets can all be utilised.

7. For inspiration research your building, and use a zoom lens to pick out focal points or architectural detail, try cropping in close for a frame filling abstract.
8. Play with perspective by standing close to a tall building and shooting straight up, using the distortion to add drama to the shot, or alternatively, stand back and include everyday objects such as cars, trees and people to give a sense of scale. Try to use a small aperture to retain detail or throw the foreground or background out of focus by using a large aperture.
9. Architecture is built on the principle of symmetry, to try and discover the centre of this symmetry, place your hand across your eyeline and compose your shot around the centre. Or alternatively, follow the principles of nature and include curves, shadows or reflections to soften the structure.

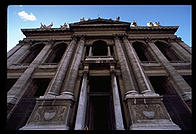
I tried to keep these guidelines in mind when taking architectural photographs on my Italy trip, particularly playing with perspective. Since I did not have a tilt-shift lens available to correct perspective I decided to emphasise this.

Taking this shot from close to the base of the pillar, it has made it appear taller, and wider at the base.
Source - digitalphotographyschool.com